 Drums
Drums
When used in conventional guitar based songs, MIDI drums can sometimes sound robotic or lifeless. In this short Audiocourses tutorial we'll examine a few ways to breathe some life into your MIDI drum parts.
For this tutorial we are going to be using Cubase SX as our sequencer (although similar results can be obtained from most of the mainstream sequencers) and triggering drum samples from a software sampler such as Battery, Halion etc If you don't have a software sampler then you can find many free options on the KVR Website.
Please note that you will find it hard to recreate a natural drum sound if you are using inappropriate drum samples (i.e. Roland 909). For the best results you need one shot samples of real drums. There are sites online that offer free or cheap drum samples, and also many music technology magazines give samples away on cover-mounted DVD's etc.
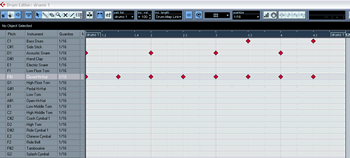 Let's start with a very straight beat programmed directly into Cubase's drum editor with all note velocities left unchanged (i.e. 100) You can see this in the screenshot on the left.
I'm going to go for a British indie sound a la Snow Patrols 'Chocolate' and The Stone Roses 'I am the Resurrection'
Example 1
As you can hear there is a definite robotic feel to the drums and they don't sound particularly lifelike at all. Most obvious is the uniform velocity of all the drums - a real drummer never hits the drums with such uniform velocity so lets try to make some changes in the velocity to give more of a real feel.
As you can see from the screenshot to the right, I've made variations in all of the velocities to try to get a bit more realism into the sound
Example 2 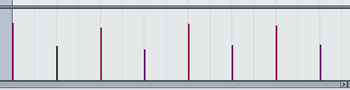
That sounds a lot better than the original take, but for my ears it is still too robotic due to the overly-perfect timing - if we were to loop that bar over and over again it would sound more obvious that it was programmed.
A drummer, being human and therefore imperfect(!), will always have slight changes in his/her playing in terms of timing so we need to replicate that. We could go through the entire song and move the positions of every single drum hit by a small amount but that would be very time consuming and could also make it sound overly sloppy. What we need to do is have a random element to the positioning that has upper and lower boundaries to prevent the timing becoming 'bad' rather than 'human'.
Luckily for us Cubase allows this to be done with the minimum of fuss! Select our MIDI drum track and choose Track Parameters from the Inspector. You should see a couple of drop down boxes underneath the heading Random and these allow us to choose parameters to have a randomized feel. In this instance we want to choose position from the first drop down box and then determine the range that our random positioning can work within. When working with Position we use a unit called 'Ticks' which are very small units indeed - by default there are 120 ticks to a 1/16th note although this can be changed in the Cubase settings. For this style of drum pattern I'd imagine that a range of about 6-10 ticks should give us a human feel. Bear in mind that a drummer can be slightly early or late with timing so to give a range of 10 we should set the min limit at -5 and the max limit at 5 giving us a range of 10 with 0 (i.e.our original positioning) in the middle of our range. For other styles of music where the drummer may 'push' the beat you could set the limits with a lower min value and a higher max value.
Whilst we're adding some random values, we could also add some 'randomness' to our velocity to further increase how human the drums sound - choose 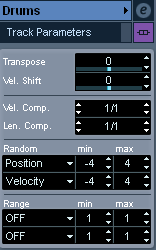 velocity from the drop down menu and then choose the min and max values - in this instance i chose a min of -4 and a max of 4.
We should now hear a subtle improvement in our drum loop:
Example 3
Listen for how the hats and the snare, which fall on the same divisions, are now not quite as tight as they were but are still 'in time'.
At this point we could move on to the sound of the drums. Although they do not sound bad, they are slightly 'weak' sounding and could do with a bit more body and punch.
What I decided to do with this example was place a distortion plug-in as an insert on the drum output and then place a compressor in the next insert slot. You can then use a combination of the gain and output levels in the distortion plug-in to drive the compressor. As I don't want a complete Garage band style drum sound I have gone easy on the distortion - I have used the bundled Quadrafuzz for this as you can tweak each frequency band before distortion.
After being distorted the signal is fed into a compressor with an attack of around 15ms and a release of about 130ms - i tweaked the ratio and threshold until I got a sound I liked - this sound ended up being the result of 10dB(!!!!) of compression on peaks but this really emphasized the ring of the snare and gave that very fat and warm indie sound I was trying to achieve but with some pumping. This may be too extreme for some tastes so as always use your own ears;
Example 4
Finally I wanted to bring a bit of coherence to the kit so I set up a plate style reverb with about 1s decay, no pre-delay and with the low end rolled off in the EQ section of the return channel to prevent the kick drum 'muddying' the reverb return. I sent some of the kit via an FX send, again using my ears rather than looking at how much i was sending on the meter. As you can hear the reverb helps to bring the kit together into a defined 'space':
Example 5
Hearing our final drum sound in context with some typically 'indie' instrumentation should reveal how successful our attempts have been;
In Context
Hopefully this has demonstrated some of the ways you can add realism to your MIDI drum parts - each project requires a different approach so the settings used here should only be considered a guide - as always your ears are the greatest judge!
